General
ePhoto
- How can I resolve stripes or bands appearing on the scanned images with ePhoto Z300?
- The scanner stops scanning, and a pop-up message reminds me to save the images before continuing.
- What should i do when z300 produces a completely black scanned image?
- Why does my ePhoto scanner's LED keep flashing yellow and won't scan?
- Why doesn't the ePhoto software interface open on the screen when I run it?
- Why my scanner scan slowly?
- How do I activate the share to email function?
- How do I adjust the scanned images?
- How do I change the scan resolution?
- How do I make a slideshow?
- How do I save a file to the 'Photos' app on my Mac?
- How do I save a scanned image to a USB drive?
- How do I scan and save a file directly without using the ePhoto interface?
- Where can I find additional help for the ePhoto software?
- Why can’t I scan both sides of a photo or document?
eScan
- What version of SharePoint On-Premises does the eScan support?
- Which model and version of network scanner do I have?
- How do I calibrate the eScan series scanner?
- How do I change the scanner date and time?
- How do I install and use the TWAIN Driver?
- How do I setup to connect the eScan to the Internet through Ethernet cable?
- How do I setup to connect the eScan wirelessly to the internet?
- How to Switch Out of S Mode in Windows 10 and Windows 11 to Install Plustek Drivers?
- How to unzip files using Windows 10?
- How do I wake up the eScan series scanner from sleep mode?How can I modify the power-saving settings?
- How to setup and use network TWAIN?
- What is power management? What does it do?
- What is Remote Management? Does it support LAN environment?
- What is the difference between network TWAIN and USB TWAIN?
- How do I add a watermark on my scanned documents?
- How do I create a job button?
- How do I scan directly to a mobile phone?
- How do I scan directly to Box?
- How do I scan directly to Dropbox?
- How do I scan directly to Evernote?
- How do I scan directly to Google Drive?
- How do I scan directly to PC?
- How do I scan to an SMB (Shared Folder)?
- How do I scan to FTP/SFTP with eScan Essential?
- How do I set up scanning directly to an email address? Is there an address book available?
- How to enable/disable double feed detection when scanning documents with attached sticky notes?
MobileOffice
- How to install the MobileOffice AD480 scanner on your computer?
- How to Switch Out of S Mode in Windows 10 and Windows 11 to Install Plustek Drivers?
- How to unzip files using Windows 10?
- Where can I download BizCard Reader software if I lost my installation CD?
- Where can I get the latest MobileOffice AD480 driver?
- A message box pop-up says "Cannot find a document. Please put the document or image in your scanner to begin the scan process" when I load papers into the feeder and press the "Scan" button. What should I do?
- How should I do when my computer or DocAction can not detect the scanner?
- I see lines through all my scanned images. What should I do?
- The color of scanned image with DocAction is different than original. What should I do?
- The DocAction output file is not searchable. What should I do?
- There's a message box pop-up says "Cannot find a document. Please put the documents in your scanner to begin the scan process." when I load the business card into card slot. What should I do?
- What should I do if the scanner pop-up a message warns me "paper jam" during scanning?
- What should I do when DocAction is hidden on the bottom right corner with red X, and I can't open the software.
- What should I do when I encounter muti-feed issue?
- Why BCR utility button is disabled?
- Why my scanner scan slowly?
- How to install the MobileOffice D430 scanner on your computer?
- How to Switch Out of S Mode in Windows 10 and Windows 11 to Install Plustek Drivers?
- How to unzip files using Windows 10?
- Where can I download BizCard Reader software if I lost my installation CD?
- Where can I get the latest MobileOffice D430 driver?
- How should I do when my computer or DocAction can not detect the scanner?
- I see lines through all my scanned images. What should I do?
- The color of scanned image with DocAction is different than original. What should I do?
- The output file in DocAction is not editable text. What should I do?
- The plastic card does not move backward after the scan
- What should I do if the scanner pop-up a message warns me "paper jam" during scanning?
- What should I do when DocAction is hidden on the bottom right corner with red X, and I can't open the software.
- When I load papers into feeder and press "SCAN" button, a message box pop-up "Cannot find a document.". What should I do?
- Why BCR utility button is disabled?
- Why my scanner scan slowly?
- Error message pop-up when I import with ID date, what should I do?
- How should I do when my computer or iKnow can not detect the MobileOffice D600 Plus scanner?
- The color on the scanned image with iKnow is slightly different from original, what should I do?
- What should I do if there are lines on the scanned documents (iKnow)?
- Why my scanner scan slowly?
- Error message pop-up when I import with ID date, what should I do?
- How should I do when my computer or iKnow can not detect the MobileOffice D620 scanner?
- The color on the scanned image with iKnow is slightly different from original, what should I do?
- What should I do if there are lines on the scanned documents (iKnow)?
- Why my scanner scan slowly?
- How should I do when MobileOffice S410 Plus stop to scan?
- The color on the scanned image with iKnow is slightly different from original, what should I do?
- The DocAction output file is not searchable. What should I do?
- There are lines through all of my MobileOffice S410 Plus scanned images. What should I do?
- What should I do when DocAction is hidden on the bottom right corner with red X, and I can't open the software.
- Why my scanner scan slowly?
OpticBook
- How to choose OCR language?
- How to convert images into text documents?
- How to enable/disable Auto Preview on Book Pavilion
- How to reduce the penetration and make the text more visible when scanning thin paper
- How to rotate images and documents?
- How to save as a Searchable PDF in Book Pavilion?
- How to scan continuously with BookPavilion?
- How to scan to default email program with BookPavilion?
- How to scan to PDF with BookPavilion?
- How to scan to third party software instantly with BookPavilion?
- How to set up your ideal format with BookPavilion?
- How to use Paint, Photoshop or GIMP to open the scanned file?
- I want to downsize my scanned file with BookPavilion, what should I do?
- I want to save my file into desktop, what should I do? How to scan to a specified folder?
- I want to scan images directly to the printer without saving to my storage device, what should I do?
- Can I adjust the brightness and contrast?
- How can I scan all pages into one PDF file (Multi-Page PDF) with eBookScan?
- How do I set the password for my PDF file?
- How many formats does eBookScan support?
- How to embed information into my scanned image file with eBookScan?
- How to enable continuous scan with eBookScan?
- How to enable hardware button to scan with eBookScan?
- How to merge 2 scanned images into one page with eBookScan?
- How to modify the file name and the saving folder with eBookScan?
- How to choose OCR language?
- How to convert images into text documents?
- How to enable/disable Auto Preview on Book Pavilion
- How to reduce the penetration and make the text more visible when scanning thin paper
- How to save as a Searchable PDF in Book Pavilion?
- How to scan continuously with BookPavilion?
- How to scan to default email program with BookPavilion?
- How to scan to PDF with BookPavilion?
- How to scan to third party software instantly with BookPavilion?
- How to set up your ideal format with BookPavilion?
- How to use Paint, Photoshop or GIMP to open the scanned file?
- I want to downsize my scanned file with BookPavilion, what should I do?
- I want to save my file into desktop, what should I do? How to scan to a specified folder?
- I want to scan images directly to the printer without saving to my storage device, what should I do?
- Can I adjust the brightness and contrast?
- How can I scan all pages into one PDF file (Multi-Page PDF) with eBookScan?
- How many formats does eBookScan support?
- How to embed information into my scanned image file with eBookScan?
- How to enable continuous scan with eBookScan?
- How to enable hardware button to scan with eBookScan?
- How to merge 2 scanned images into one page with eBookScan?
- How to modify the file name and the saving folder with eBookScan?
- When it shows "Not found Plustek OpticBook scanner", how should I do?
- How to choose OCR language?
- How to convert images into text documents?
- How to enable/disable Auto Preview on Book Pavilion
- How to reduce the penetration and make the text more visible when scanning thin paper
- How to rotate images and documents?
- How to save as a Searchable PDF in Book Pavilion?
- How to scan continuously with BookPavilion?
- How to scan to default email program with BookPavilion?
- How to scan to PDF with BookPavilion?
- How to scan to third party software instantly with BookPavilion?
- How to set up your ideal format with BookPavilion?
- How to use Paint, Photoshop or GIMP to open the scanned file?
- I want to downsize my scanned file with BookPavilion, what should I do?
- I want to save my file into desktop, what should I do? How to scan to a specified folder?
- I want to scan images directly to the printer without saving to my storage device, what should I do?
OpticFilm
- Is the iSRD function not available on B/W film?
- What should I do if there are strips on the scanned image (SilverFast)?
- What should I do if there is abnormal sound or strange noise while scanning? (SilverFast)
- What should I do when the slide image is not clear or blurred? (SilverFast)
- What to do when SilverFast can’t detect the scanner under Windows system?
- Why my scanner scan slowly?
- How do I install drivers and SilverFast 8 if I don’t have a CD-ROM?
- How to activate SilverFast with my OpticFilm 120 Pro?
- How to Switch Out of S Mode in Windows 10 and Windows 11 to Install Plustek Drivers?
- How to unzip files using Windows 10?
- How to upgrade to SilverFast 9 for OpticFilm 120 Pro?
- How to use SilverFast after all software is installed?
- Is the iSRD function not available on B/W film?
- What should I do if there are strips on the scanned image (SilverFast)?
- What should I do if there is abnormal sound or strange noise while scanning? (SilverFast)
- What should I do when the slide image is not clear or blurred? (SilverFast)
- What to do when SilverFast can’t detect the scanner under Windows system?
- Why my scanner scan slowly?
- How should I do when my computer or QuickScan Plus can not detect scanner?
- How to awake OpticFilm 135i scanner for scanning?
- The OpticFilm 135i scanner doesn't work properly when I press the button. What should I do?
- What should I do when the slide image is not clear or blurred? (QuickScan Plus)
- Why my scanner scan slowly?
- Does the OF135i support scanning panoramic film?
- How to enable remove scratch and dust function?
- How to enable sleep mode in QuickScan Plus?
- How to modify the file name and the saving folder in QuickScan Plus?
- How to open the scanned images in 3rd party image editing software?
- How to select discontinuously images on View screen?
- Why can't I set 7200 dpi under custom mode?
- How do I install drivers and SilverFast 8 if I don’t have a CD-ROM?
- How to activate SilverFast 9 with myOpticFilm 8100/ 8200i SE/ 8200i Ai/ 8300i SE/ 8300i Ai?
- How to Switch Out of S Mode in Windows 10 and Windows 11 to Install Plustek Drivers?
- How to unzip files using Windows 10?
- How to upgrade to SilverFast 9?
- How to use SilverFast after all software is installed?
- QuickScan – How to start
- What should I do if there are strips on the scanned image (SilverFast)?
- What should I do if there is abnormal sound or strange noise while scanning? (SilverFast)
- What should I do when the slide image is not clear or blurred? (SilverFast)
- What to do when SilverFast can’t detect the scanner under Windows system?
- Why my scanner scan slowly?
- How thick can the slide frames be in order to be able to work with the OF8xxx series without any problems?
- How to reset the settings of SilverFast?
- How to work with SilverFast 9 WorkflowPilot?
- Is OF8xxx series suitable for scanning APS Film?
- What are the differences between the QuickScan and IntelliScan buttons.
- How do I install drivers and SilverFast 8 if I don’t have a CD-ROM?
- How to activate SilverFast 9 with myOpticFilm 8100/ 8200i SE/ 8200i Ai/ 8300i SE/ 8300i Ai?
- How to Switch Out of S Mode in Windows 10 and Windows 11 to Install Plustek Drivers?
- How to unzip files using Windows 10?
- How to upgrade to SilverFast 9?
- How to use SilverFast after all software is installed?
- QuickScan – How to start
- Is the iSRD function not available on B/W film?
- What should I do if there are strips on the scanned image (SilverFast)?
- What should I do if there is abnormal sound or strange noise while scanning? (SilverFast)
- What should I do when the slide image is not clear or blurred? (SilverFast)
- What to do when SilverFast can’t detect the scanner under Windows system?
- Why my scanner scan slowly?
- How thick can the slide frames be in order to be able to work with the OF8xxx series without any problems?
- How to reset the settings of SilverFast?
- How to use iSRD function to obtain better image result when there are scratches or dirt on my image?
- How to use IT8 calibration target?
- How to work with SilverFast 9 WorkflowPilot?
- Is OF8xxx series suitable for scanning APS Film?
- What are the differences between the QuickScan and IntelliScan buttons.
- How do I install drivers and SilverFast 8 if I don’t have a CD-ROM?
- How to activate SilverFast 9 with myOpticFilm 8100/ 8200i SE/ 8200i Ai/ 8300i SE/ 8300i Ai?
- How to Switch Out of S Mode in Windows 10 and Windows 11 to Install Plustek Drivers?
- How to unzip files using Windows 10?
- How to upgrade to SilverFast 9?
- How to use SilverFast after all software is installed?
- QuickScan – How to start
- Is the iSRD function not available on B/W film?
- What should I do if there are strips on the scanned image (SilverFast)?
- What should I do if there is abnormal sound or strange noise while scanning? (SilverFast)
- What should I do when the slide image is not clear or blurred? (SilverFast)
- What to do when SilverFast can’t detect the scanner under Windows system?
- Why my scanner scan slowly?
- How thick can the slide frames be in order to be able to work with the OF8xxx series without any problems?
- How to reset the settings of SilverFast?
- How to use iSRD function to obtain better image result when there are scratches or dirt on my image?
- How to work with SilverFast 9 WorkflowPilot?
- Is OF8xxx series suitable for scanning APS Film?
- What are the differences between the QuickScan and IntelliScan buttons.
- How to activate SilverFast 9 with myOpticFilm 8100/ 8200i SE/ 8200i Ai/ 8300i SE/ 8300i Ai?
- How to activate SilverFast with my OpticFilm 8300i Series?
- How to Switch Out of S Mode in Windows 10 and Windows 11 to Install Plustek Drivers?
- How to unzip files using Windows 10?
- How to use SilverFast after all software is installed?
- Is the iSRD function not available on B/W film?
- What should I do if there are strips on the scanned image (SilverFast)?
- What should I do if there is abnormal sound or strange noise while scanning? (SilverFast)
- What should I do when the slide image is not clear or blurred? (QuickScan Plus)
- What should I do when the slide image is not clear or blurred? (SilverFast)
- What to do when SilverFast can’t detect the scanner under Windows system?
- Why my scanner scan slowly?
- How thick can the slide frames be in order to be able to work with the OF8xxx series without any problems?
- How to enable remove scratch and dust function?
- How to modify the file name and the saving folder in QuickScan Plus?
- How to open the scanned images in 3rd party image editing software?
- How to reset the settings of SilverFast?
- How to select discontinuously images on View screen?
- How to use iSRD function to obtain better image result when there are scratches or dirt on my image?
- How to use IT8 calibration target?
- How to work with SilverFast 9 WorkflowPilot?
- Is OF8xxx series suitable for scanning APS Film?
- What are the differences between the QuickScan and IntelliScan buttons.
- How to activate SilverFast 9 with myOpticFilm 8100/ 8200i SE/ 8200i Ai/ 8300i SE/ 8300i Ai?
- How to activate SilverFast with my OpticFilm 8300i Series?
- How to Switch Out of S Mode in Windows 10 and Windows 11 to Install Plustek Drivers?
- How to unzip files using Windows 10?
- How to use SilverFast after all software is installed?
- Is the iSRD function not available on B/W film?
- What should I do if there are strips on the scanned image (SilverFast)?
- What should I do if there is abnormal sound or strange noise while scanning? (SilverFast)
- What should I do when the slide image is not clear or blurred? (QuickScan Plus)
- What should I do when the slide image is not clear or blurred? (SilverFast)
- What to do when SilverFast can’t detect the scanner under Windows system?
- Why my scanner scan slowly?
- How thick can the slide frames be in order to be able to work with the OF8xxx series without any problems?
- How to enable remove scratch and dust function?
- How to modify the file name and the saving folder in QuickScan Plus?
- How to open the scanned images in 3rd party image editing software?
- How to reset the settings of SilverFast?
- How to select discontinuously images on View screen?
- How to use iSRD function to obtain better image result when there are scratches or dirt on my image?
- How to work with SilverFast 9 WorkflowPilot?
- Is OF8xxx series suitable for scanning APS Film?
- What are the differences between the QuickScan and IntelliScan buttons.
OpticPro
- How should I do when my computer or DocAction can not detect the scanner?
- The color of scanned image with DocAction is different than original. What should I do?
- The output file is not editable text. What should I do? (A320L)
- What should I do if the scanner's optic module stops during the scanning procedure and makes a grinding noise?
- What should I do when DocAction is hidden on the bottom right corner with red X, and I can't open the software.
- Why my scanner scan slowly?
- How can I scan multiple pages into a separate PDF file with DocAction?
- How can I scan multiple pages into one PDF file (Multi-Page PDF) with DocAction button utility software?
- How do I name a scanned document in DocAction?
- How do I scan to FTP server with DocAction?
- How to awake scanner for scanning?
- How to disable sleep mode in OpticPro A3 scanner?
- What are the functions of the 7 hardware buttons on the OpticPro scanner?
- How to install the OpticPro A320L scanner on your computer?
- How to unzip files using Windows 10?
- What should I do if the scanner's optic module stops during the scanning procedure and makes a grinding noise?
- Where can I get the latest OpticPro A320L driver?
- Where can I get the latest OpticSlim 1180 driver?
- How should I do when my computer or DocAction can not detect the scanner?
- The color of scanned image with DocAction is different than original. What should I do?
- The output file is not editable text. What should I do? (A320L)
- What should I do if the scanner's optic module stops during the scanning procedure and makes a grinding noise?
- What should I do when DocAction is hidden on the bottom right corner with red X, and I can't open the software.
- Why my scanner scan slowly?
- How can I scan multiple pages into a separate PDF file with DocAction?
- How can I scan multiple pages into one PDF file (Multi-Page PDF) with DocAction button utility software?
- How do I name a scanned document in DocAction?
- How do I scan to FTP server with DocAction?
- How to awake scanner for scanning?
- How to disable sleep mode in OpticPro A3 scanner?
- What are the functions of the 7 hardware buttons on the OpticPro scanner?
OpticSlim
- How should I do when my computer or DocAction can not detect the scanner?
- The colors of the scanned images are strange, or there are some stripes on the scanned image.
- The OpticSlim 1180 scanner doesn't work properly when I press the start button. What should I do?
- The scanned image from photos have lines or wave marks.
- The scanned images with DocAction/MacAction are not very clear
- What should I do if I set the scan to 1200dpi and a warning message keeps popping up?
- What should I do if the power button light is off?
- What should I do when DocAction is hidden on the bottom right corner with red X, and I can't open the software.
- Why my scanner scan slowly?
- Articles coming soon
SecureScan Series
- How could I get sample code for X-Mini?
- How could I get SDK for X-Mini?
- How should I do when my computer or SecureScan can not detect X-Mini?
- How to Switch Camera Permissions in Windows 10 Settings
- My scanned image with SecureScan is different from the original, what should I do?
- Where can I get the latest SecureScan X-Mini software?
SmartOffice
- How do I calibrate the PSD300 scanner?
- How do I synchronize the eConnector buttons with the scanner's hardware buttons?
- My scanned documents with eConnector aren't searchable. What should I do? How can I make it so that I can select and edit the text?
- My scanned image is different from the original, what should I do? (PSD300)
- The eConnector software application shows "scanner not found" what should I do?
- The maintenance wizard interface displays "!" symbol, prompting me to replace the rollers. How do I replace the product rollers?
- What should I do when paper jammed occurs in PSD300?
- What should I do when there are stripes on my PSD300 scanned images?
- What should I do when upload fails?
- Why my scanner scan slowly?
- How can I apply an automatic naming scheme to my scanned documents in eConnector?
- How do I configure a job button in eConnector?
- How do I create a new job button in eConnector?
- How do I disable running eConnector during Startup?
- How do I disable the help banner at the top of the eConnector software?
- How do I minimize the eConnector software window?
- How do I reposition the eConnector software application?
- How do I resize the eConnector software window?
- How do I calibrate the PSD300 scanner?
- How do I synchronize the eConnector buttons with the scanner's hardware buttons?
- My scanned documents with eConnector aren't searchable. What should I do? How can I make it so that I can select and edit the text?
- My scanned image is different from the original, what should I do? (PSD300)
- The eConnector software application shows "scanner not found" what should I do?
- The maintenance wizard interface displays "!" symbol, prompting me to replace the rollers. How do I replace the product rollers?
- What should I do when paper jammed occurs in PSD300?
- What should I do when there are stripes on my PSD300 scanned images?
- What should I do when upload fails?
- Why my scanner scan slowly?
- How can I scan multiple pages into a separate PDF file with eConnector?
- How do I configure a job button in eConnector?
- How do I create a new job button in eConnector?
- How do I disable running eConnector during Startup?
- How do I disable the help banner at the top of the eConnector software?
- How do I minimize the eConnector software window?
- How do I reposition the eConnector software application?
- How do I resize the eConnector software window?
- How can I calibrate my scanner if lines or color discrepancies appear in the scanned documents?
- How should I do when my computer or DocAction can not detect the scanner?
- The color of scanned image with DocAction is different than original. What should I do?
- The output file in DocAction is not editable text. What should I do?
- What should I do if the scanner pop-up a message warns me "paper jam" during scanning?
- What should I do when DocAction is hidden on the bottom right corner with red X, and I can't open the software.
- How can I scan documents with DocAction into a multi-PDF file?
- How can I scan multiple pages into a separate PDF file with DocAction?
- How do I name a scanned document in DocAction?
- How to awake scanner for scanning?
- How to output multi images?
- What do the numbers on the hardware button display on the LED screen mean?
- How should I do when my computer or DocAction II cannot detect scanner?
- How to deal with the strips or bands on the DocAction II scanned images?
- What is calibration, and how do I perform it in DocAction II?
- What should I do if DocAction II displays a message indicating that it did not detect paper inside the feeder before scanning?
- What should I do if the PS186 scanner has multi-feed issues?
- How should I do when my computer or DocAction II cannot detect scanner?
- How to deal with the strips or bands on the DocAction II scanned images?
- What is calibration, and how do I perform it in DocAction II?
- What should I do if DocAction II displays a message indicating that it did not detect paper inside the feeder before scanning?
- What should I do if the PS186 scanner has multi-feed issues?
- How can I calibrate my scanner if lines or color discrepancies appear in the scanned documents?
- How should I do when my computer or DocAction can not detect the scanner?
- The color of scanned image with DocAction is different than original. What should I do?
- The output file in DocAction is not editable text. What should I do?
- What should I do if the scanner pop-up a message warns me "paper jam" during scanning?
- What should I do when DocAction is hidden on the bottom right corner with red X, and I can't open the software.
- How can I scan multiple pages into a separate PDF file with DocAction?
- How can I scan multiple pages into one PDF file (Multi-Page PDF) with DocAction button utility software?
- How do I name a scanned document in DocAction?
- How to awake scanner for scanning?
- How to output multi images?
- What do the numbers on the hardware button display on the LED screen mean?
- How should I do when my computer or DocAction can not detect the scanner?
- The color of scanned image with DocAction is different than original. What should I do?
- The output file in DocAction is not editable text. What should I do?
- What should I do if the scanner pop-up a message warns me "paper jam" during scanning?
- What should I do when DocAction is hidden on the bottom right corner with red X, and I can't open the software.
- How can I scan multiple pages into a separate PDF file with DocAction?
- How can I scan multiple pages into one PDF file (Multi-Page PDF) with DocAction button utility software?
- How do I name a scanned document in DocAction?
- How to awake scanner for scanning?
- How to output multi images?
- What do the numbers on the hardware button display on the LED screen mean?
Software
- Articles coming soon
- How to choose OCR language?
- How to convert images into text documents?
- How to enable/disable Auto Preview on Book Pavilion
- How to install the OpticBook 3800L scanner and download Book Pavilion on your computer?
- How to reduce the penetration and make the text more visible when scanning thin paper
- How to rotate images and documents?
- How to save as a Searchable PDF in Book Pavilion?
- How to scan continuously with BookPavilion?
- How to scan to default email program with BookPavilion?
- How to scan to PDF with BookPavilion?
- How to scan to third party software instantly with BookPavilion?
- How to set up your ideal format with BookPavilion?
- How to use Paint, Photoshop or GIMP to open the scanned file?
- I want to downsize my scanned file with BookPavilion, what should I do?
- I want to save my file into desktop, what should I do? How to scan to a specified folder?
- I want to scan images directly to the printer without saving to my storage device, what should I do?
- Show Remaining Articles (1) Collapse Articles
- A message box pop-up says "Cannot find a document. Please put the document or image in your scanner to begin the scan process" when I load papers into the feeder and press the "Scan" button. What should I do?
- How can I launch DocAction software (Windows)?
- How can I scan documents with DocAction into a multi-PDF file?
- How can I scan multiple pages into a separate PDF file with DocAction?
- How can I scan multiple pages into one PDF file (Multi-Page PDF) with DocAction button utility software?
- How do I name a scanned document in DocAction?
- How do I name a scanned document? (AD480)
- How do I scan to FTP server with DocAction?
- How should I do when my computer or DocAction can not detect the scanner?
- How to output multi images?
- MacAction icon shows a red cross and won’t execute. How can I confirm if my computer has detected the scanner?
- The color of scanned image with DocAction is different than original. What should I do?
- The colors of the scanned images are strange, or there are some stripes on the scanned image.
- The DocAction output file is not searchable. What should I do?
- The output file in DocAction is not editable text. What should I do?
- The output file is not editable text. What should I do? (A320L)
- The scanned image from photos have lines or wave marks.
- The scanned images with DocAction/MacAction are not very clear
- There's a message box pop-up says "Cannot find a document. Please put the documents in your scanner to begin the scan process." when I load the business card into card slot. What should I do?
- What are the functions of the 7 hardware buttons on the OpticPro scanner?
- What are the functions of the hardware buttons on the AD480 scanner?
- What should I do if I set the scan to 1200dpi and a warning message keeps popping up?
- What should I do if the scanner pop-up a message warns me "paper jam" during scanning?
- What should I do when DocAction is hidden on the bottom right corner with red X, and I can't open the software.
- When I load papers into feeder and press "SCAN" button, a message box pop-up "Cannot find a document.". What should I do?
- Show Remaining Articles (10) Collapse Articles
- How do I name a scanned file with DocAction II?
- How should I do when my computer or DocAction II cannot detect scanner?
- How to create scan profile with DocAction II?
- How to deal with the strips or bands on the DocAction II scanned images?
- How to remove blank pages with DocAction II?
- How to scan and search the document with DocAction II?
- What are the image processing features supported by DocAction II?
- What is calibration, and how do I perform it in DocAction II?
- What is FTS?
- What should I do if DocAction II displays a message indicating that it did not detect paper inside the feeder before scanning?
- Can I adjust the brightness and contrast?
- How can I scan all pages into one PDF file (Multi-Page PDF) with eBookScan?
- How do I set the password for my PDF file?
- How many formats does eBookScan support?
- How to embed information into my scanned image file with eBookScan?
- How to enable continuous scan with eBookScan?
- How to enable hardware button to scan with eBookScan?
- How to merge 2 scanned images into one page with eBookScan?
- How to modify the file name and the saving folder with eBookScan?
- How do I calibrate the PSD300 scanner?
- How do I configure a job button in eConnector?
- How do I create a new job button in eConnector?
- How do I disable running eConnector during Startup?
- How do I disable the help banner at the top of the eConnector software?
- How do I minimize the eConnector software window?
- How do I reposition the eConnector software application?
- How do I resize the eConnector software window?
- How do I synchronize the eConnector buttons with the scanner's hardware buttons?
- My scanned documents with eConnector aren't searchable. What should I do? How can I make it so that I can select and edit the text?
- The eConnector software application shows "scanner not found" what should I do?
- What should I do when paper jammed occurs in PSD300?
- What should I do when there are stripes on my PSD300 scanned images?
- What should I do when upload fails?
- Error message pop-up when I import with ID date, what should I do?
- How to calibrate the scanner from iKnow software?
- How to export data into excel format?
- How to save scanned image and edit the information?
- The color on the scanned image with iKnow is slightly different from original, what should I do?
- What should I do if there are lines on the scanned documents (iKnow)?
- Which file format is supported when I import the files?
- How should I do when my computer or QuickScan Plus can not detect scanner?
- How to enable remove scratch and dust function?
- How to enable sleep mode in QuickScan Plus?
- How to modify the file name and the saving folder in QuickScan Plus?
- How to open the scanned images in 3rd party image editing software?
- How to select discontinuously images on View screen?
- What should I do when the slide image is not clear or blurred? (QuickScan Plus)
- Why can't I set 7200 dpi under custom mode?
- How could I get sample code for X-Mini?
- How could I get SDK for X-Mini?
- How could I output scanned image to printer from SecureScan Manager software?
- How could I output scanned image to printer from SecureScan software?
- How do I edit scan settings on SecureScan Manager?
- What kinds of data format could I export from SecureScan Manager ?
- Where can I get the latest SecureScan X-Mini software?
- How do I install drivers and SilverFast 8 if I don’t have a CD-ROM?
- How to activate SilverFast 9 with myOpticFilm 8100/ 8200i SE/ 8200i Ai/ 8300i SE/ 8300i Ai?
- How to activate SilverFast with my OpticFilm 120 Pro?
- How to activate SilverFast with my OpticFilm 8300i Series?
- How to reset the settings of SilverFast?
- How to upgrade to SilverFast 9 for OpticFilm 120 Pro?
- How to upgrade to SilverFast 9?
- How to use batch scan with OpticFilm 120?
- How to use iSRD function to obtain better image result when there are scratches or dirt on my image?
- How to use IT8 calibration target?
- How to use SilverFast after all software is installed?
- How to work with SilverFast 9 WorkflowPilot?
- Is the iSRD function not available on B/W film?
- What should I do if I lose my SilverFast 8 key?
- What should I do if there are strips on the scanned image (SilverFast)?
- What should I do if there is abnormal sound or strange noise while scanning? (SilverFast)
- What should I do when the slide image is not clear or blurred? (SilverFast)
- What to do when SilverFast can’t detect the scanner under Windows system?
- Show Remaining Articles (3) Collapse Articles
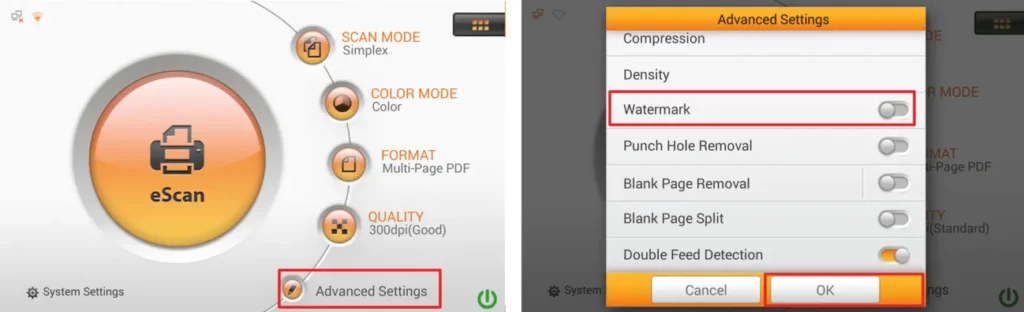
To add a watermark on the document, you have to set the relevant settings in the “Initial Settings”, then enabled/disabled watermark function in “Advanced Settings”.
1. Go to the folder which you download the zip files from Plustek.
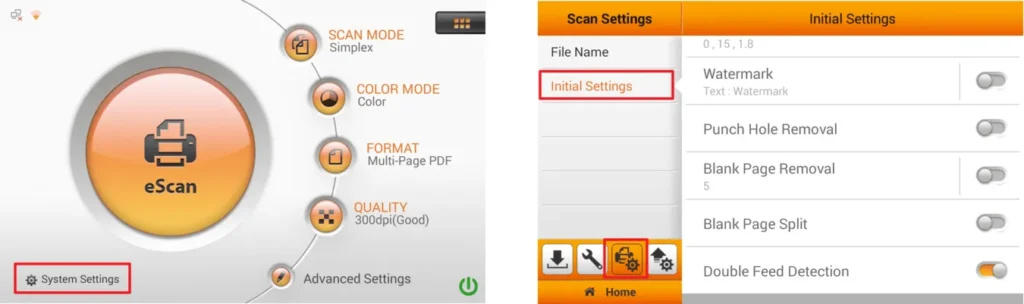
2. Tap on “Watermark” then select “image or text” to activate the watermark function.
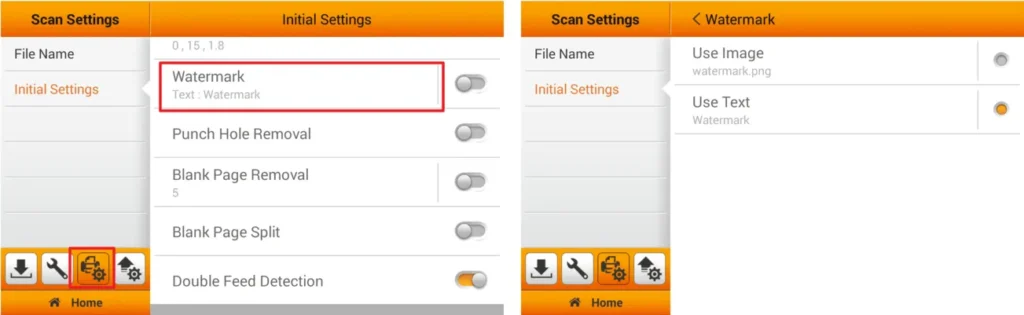
3. If you select ‘Use Image as the Watermark,’ upload your desired image and choose its position. Tap the button to upload the image.
Please note that when using an image file for your watermark overlay, we recommend the image size be no larger than 800×800 pixels. The ideal size and format are 600×200 pixels; PNG. The color of the image overlay will match your scanning color mode, so adjust the transparency accordingly.
Note: For Black & White scans, we strongly recommend setting the transparency to 150%.
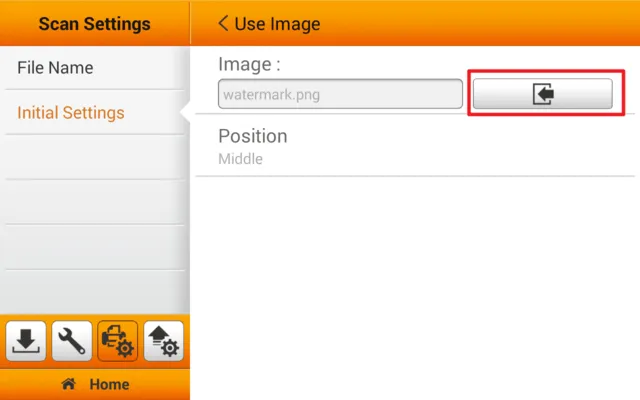
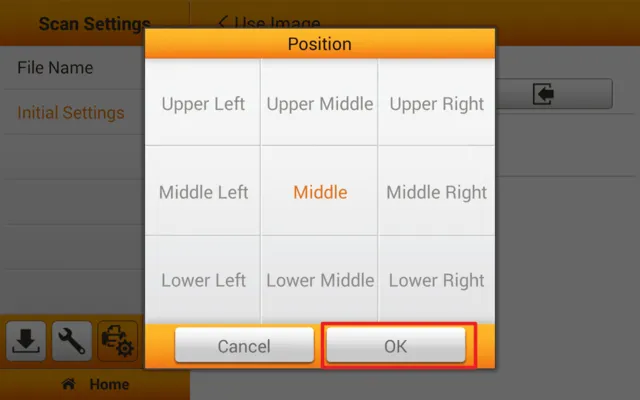
4. Tap on Position to select the desired position. There are 9 positions to choose from. Tap the OK button to confirm the settings or tap Cancel to exit this dialog.
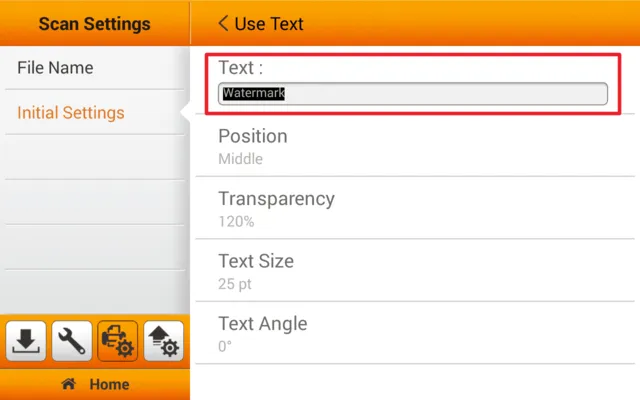
5. If you select ‘Use Text as the Watermark,’ enter the desired text, choose its position, and adjust the Transparency, Text Size, and Text Angle.
6. Once you enable the ‘Watermark’ function in the initial settings, every scanned document will include the watermark by default. To disable this function, go to Advanced Settings and turn it off.